
So you think you know box shadows?
Box shadows. I love them.
Four years ago, I found out my M1 can render a stupid number of these bad boys, and so I set out to see just how far you can push them, and boy did I. If you are looking for a how to use box shadows to get the look of the latest UX trend, this is not the right article for you. But if you like some janky creativity, stay tuned.
I want to share some of the worst possible things one can do with box shadows all on a single div. Things which shouldn't work at all yet somehow they do. But before getting into that, a question must be answered.
What exactly is a box shadow?
Graphic design 101
A box shadow is a kind of drop shadow. And a drop shadow is a kind of image filter which is particularly popular in graphic design due to how versatile it is at adding an approximation of depth to composition.
The filter takes the raster of an image and shifts the pixels along the x and y axis. It will draw these pixels as a single color behind the source image. This gives an illusion of depth by dropping the outline of an image as a "shadow" into the composition hence the name drop shadow.
We can use the css filter property to see this in action.
div {
  filter: drop-shadow(xOffset yOffset rgba(0, 0, 0, 0.5));
}
There are many different implementations of a drop shadow filter across different tools like photoshop, gimp, figma, and css each having a different set of features. For example css also supports an optional blur value to apply to the drop shadow.
div {
  filter: drop-shadow(xOffset yOffset blurSize rgba(0, 0, 0, 0.5));
}
By layering several drop filters one can easily add interesting depth to a composition.
For example, here are 2 layered drop-shadow filters.
Nifty.
What about box shadows?
The Box Shadow
A box shadow is a form of drop filter with many trade offs. First, the name "Box" has to do with the filter only supporting box shapes. For example, lets try applying it to the previous example.
Notice that the shadow shape is limited to the bounding box of the container and how the shadow can break out of the bounding box. This seems limiting but it comes with a few more features one of which is performance.
It turns out that the majority of user interfaces are made up of boxes. It also turns out that some smart people figured out maths hacks to draw rounded boxes for super cheap which UI peeps love because with this hack boxes can be so round as to appear as circles. And the css box shadow implementation supports this math hack.
This means that designers can be liberal with box shadows rather than relying on prerendered source images bloating download sizes.
This little mixer shows the variety of shapes available. Tap to randomize the color.
This opens up a all kinds of freedom for UI design. Layering these together can produce amazing results. You can play around with a border editor here.
Layering. That is an important word. You can layer or chain many box shadows together on a single div. The above example uses this to set the colors.
function randomizeAndColor(e) {
  randomize(e);
  const spread = Math.random() > 0.8 ? 2 : 0;
  const x1 = Math.floor(3 - Math.random() * 6) / (1 + spread);
  const y1 = Math.floor(3 - Math.random() * 6) / (1 + spread);
  const y2 = 2 + Math.floor(Math.random() * 4);
  const blur2 = 8 + Math.floor(Math.random() * 12);
  e.style.boxShadow = `${x1}px ${y1}px 0px ${spread}px ${getRandomPastelColor()}, 0 ${y2}px ${blur2}px #0006`;
}
How not to use box shadows
Usually, a designer will carefully position squares within other squares with consistent margins, paddings, and typography for optimal accessibility and understandability. Wisely, they further add layered shadows and perhaps a few images to help visually distinguish widget interaction and state.
That is all well and good but what we are really working with is a kind of painting api. We can paint an arbitrary number of squares to the screen optionally applying a blur to them.
I initially explored this with some minimal art in an earlier write up.
I liked the results.
The config that drives this is pretty simple.
const blocks = [
  [8, "#114d33"],
  [24, "#50bbab"],
  [28, "#fcba94"],
  [10, "#eced26"],
  // ...other characters
];

<MinimalSets blockLists={blocks} />;
Now the natural question I am sure you have and I certainly had was, "can we do more box shadows?" What about blurring or transparency? How do they impact performance?
I whipped up a little visual tool where a giant box shadow is created and set on a div like so.
const computedBoxShadow = points.map(
  ([x, y], i) =>
    `${x}px ${y}px ${getBlur(i, frame)}px ${animatedColor()}`
).join(",")

//...other code

<style>`
  myDiv {
    box-shadow: ${computedBoxShadow};
  }
`</style>
Animation is handled by setting the box shadow string every 300ms and then letting transition: all prop do the animation. This causes some jank and ended up being slower that setting the box shadow on every frame.
The result is an app where you can tap to remix a color palette with a history of the last 10 palettes to the left. Here is an example with 100 box shadows. Tap around.
I noticed that applying a blur slowed down the number you could animate which makes sense. However, using a transparent color significantly slowed down the number that can be drawn too which doesn't make as much sense to me. I'd imagine that with hardware today transparency should be somewhat free. The div size also impacts performance which makes me think there is some software rasterizer involved when things are animated. I could look into the source code of browsers but it would be different depending on the js engine.
However, I found that if I didn't set any transparency or blur, my M1 laptop could draw buckets of box shadows. Like thousands of them.
How to seriously not use box shadows
Ok, many box shadows can be drawn. Now what?
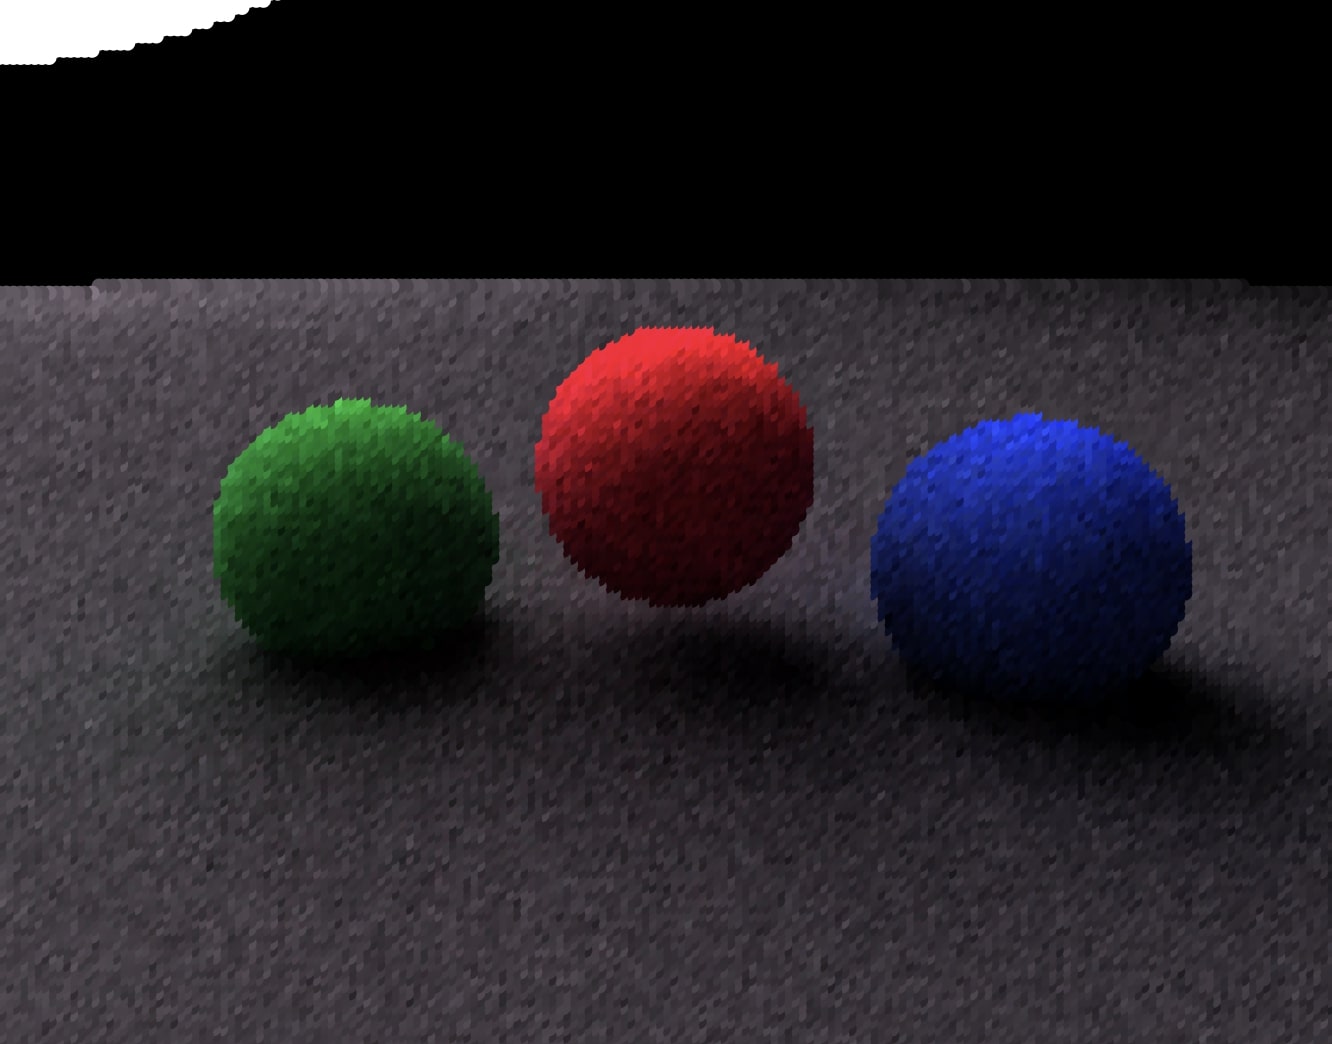
Well we cannot rotate the box shadows but they can be circles and a circle kinda looks like a ball. So what if I made a bunch of balls that could bounce around? And maybe I can "fake" a 3d effect by scaling the size based on a z value. This wouldn't be accurate perspective but would add some 3d depth.
This one is pretty simple. Just a big'ol "gamestate" updated in a requestAnimationFrame and then set a giant box shadow string on div. You can touch somewhere to pull the balls towards you. The balls are contained to a box and will bounce to stay in frame.
Toss a tick function into requestAnimationFrame
const tick = (timestamp: number) => {
  gameState.frame++;
  gameState.deltaTime = Math.min(
    (timestamp - gameState.prevFrameStartTime) / 1000,
    0.1
  );
  gameState.prevFrameStartTime = timestamp;
  update(gameState);
  render(gameState);
  winContext._gameFrame = window.requestAnimationFrame(tick);
};
Updating the simulation isn't complicated but for the sake of brevity I will use a bit of psudocode.
const update: GameFunction = (state) => {
  for (const ball in state) {
    updateBall();
    containBall();
    addFriction();
    if (touched) pullToPoint(touchX, touchY);
  }
};
Now rendering is the interesting part. What is going to be run 60 time a second is the following.
const render: GameFunction = (state) => {
  const boxShadowString = state.balls
    .sort((a, b) => b.z - a.z)
    .map((ball) => {
      const zIndexScale = 1 + ball.z / 30;
      const size = ball.size * zIndexScale;
      const halfSize = (size - state.renderContainerSize) / 2;
      const hcs = state.renderContainerSize / 2;
      return [
        ball.x + hcs,
        "px ",
        ball.y + hcs,
        "px 0 ",
        halfSize,
        "px ",
        ball.color,
      ].join("");
    })
    .join(",");
  const renderEl = document.getElementById("render");
  if (renderEl) {
    renderEl.style.boxShadow = boxShadowString;
  }
};
Sort the balls based on z index and fill an array of box shadows. The size calculation is based off of wanting to have x,y,z represent the center of a ball with a radius of size. The z scale is a hack to have some z "depth" where the size is scaled based on a fixed ratio.
Here are 50 balls. Drag em around and make em bounce on the sides.
The 3d scaling works pretty well to give a little bit of depth even if it is total bs. You can notice that when a ball gets close to the "camera" at a certain point it is no longer a circle. This is because the box shadow div is too small for the scaling method. Increasing the container size fixes this but a larger container means slower performance.
Let's see what happens if the balls can bounce off each other with some good old fashion n^2 collision check. Now, I am only going to reflect the balls velocity on a collision detection which is inaccurate but simple. This is not simulating any real physics interaction. I will also fix the z position to make it 2d so it is easier to see what is happening.
Not very interesting. I think something more accurate physics would look nicer but maybe another time. Adding a phone gyro as input to this could be fun too but again maybe another time.
I reproduced another setup where the balls always try and find their way home to a random starting position. The force of a touch is enough to pull them away however. This give an effect almost like a sponge where you can pull bits off. I can think of ways this could be used for some foam spray in fake fluid sim as part of a game or something. Kind of fun.
I noticed that the fake 3d really comes out in the above example as the balls slowly travel back home. How could the 3d aspect be taken further? Maybe I could draw point clouds with the box shadows as points? I could project points on difference surfaces and then draw the points like some godawful 3d renderer.
I thought a good starting point would be to simply map pixels from a picture as points on a 2d plane. This would also be a good stress test to find out what the upper limit is on number of realtime simulated box shadows. Here is the mapping function.
const pixels = await getImagePixels(
  "/images/starry_night_full.jpg" as any,
  width
);
const dx = window.innerWidth / pixels[0].length;
const dy = window.innerHeight / pixels.length;
for (let y = 0; y < pixels.length; y++) {
  for (let x = 0; x < pixels[0].length; x++) {
    const px = x * dx + dx / 2,
      py = y * dy + dy / 2,
      pz = 60 + Math.random() * 3;
    state.particles.push({
      size: pSize,
      x: px,
      y: py,
      z: pz,
      ox: px,
      oy: py,
      oz: pz,
      dx: Math.random() * 3,
      dy: Math.random() * 3,
      dz: Math.random() * 3,
      color: pixels[y][x],
    });
  }
}
The image is scaled to fit a max width which can be configured in a query param but otherwise it is the same as before. If you want the source, here is the codesandbox.
I started with one of my all time favorite paintings ever. Tap around.
Depending on your device, this demo may be melting it as it is rendering several thousand box shadows in simulated 3d space. You can drag around to kinda explode the image up. This is taking the previous examples and setting the starting positions and colors based on an image.
I am going to bump up the count and rotate the camera. I will record this one to save some battery life. If you want to burn your battery give a live version a try here. You have been warned.
This is promising. I personally love how this has an almost painted style due to the circular pixels looking kinda splatted on. Here is another example with an increased count and some interaction.
You can see it is chugging at this scale. For reference, this is somewhere in the ballpark of 12,000 box shadows. I mean, damn. I wonder if perhaps it is so fast because the M1 has shared gpu and cpu memory? My desktop certainly cannot push this many box shadows neither can my iphone or old android. Crazy result tho.
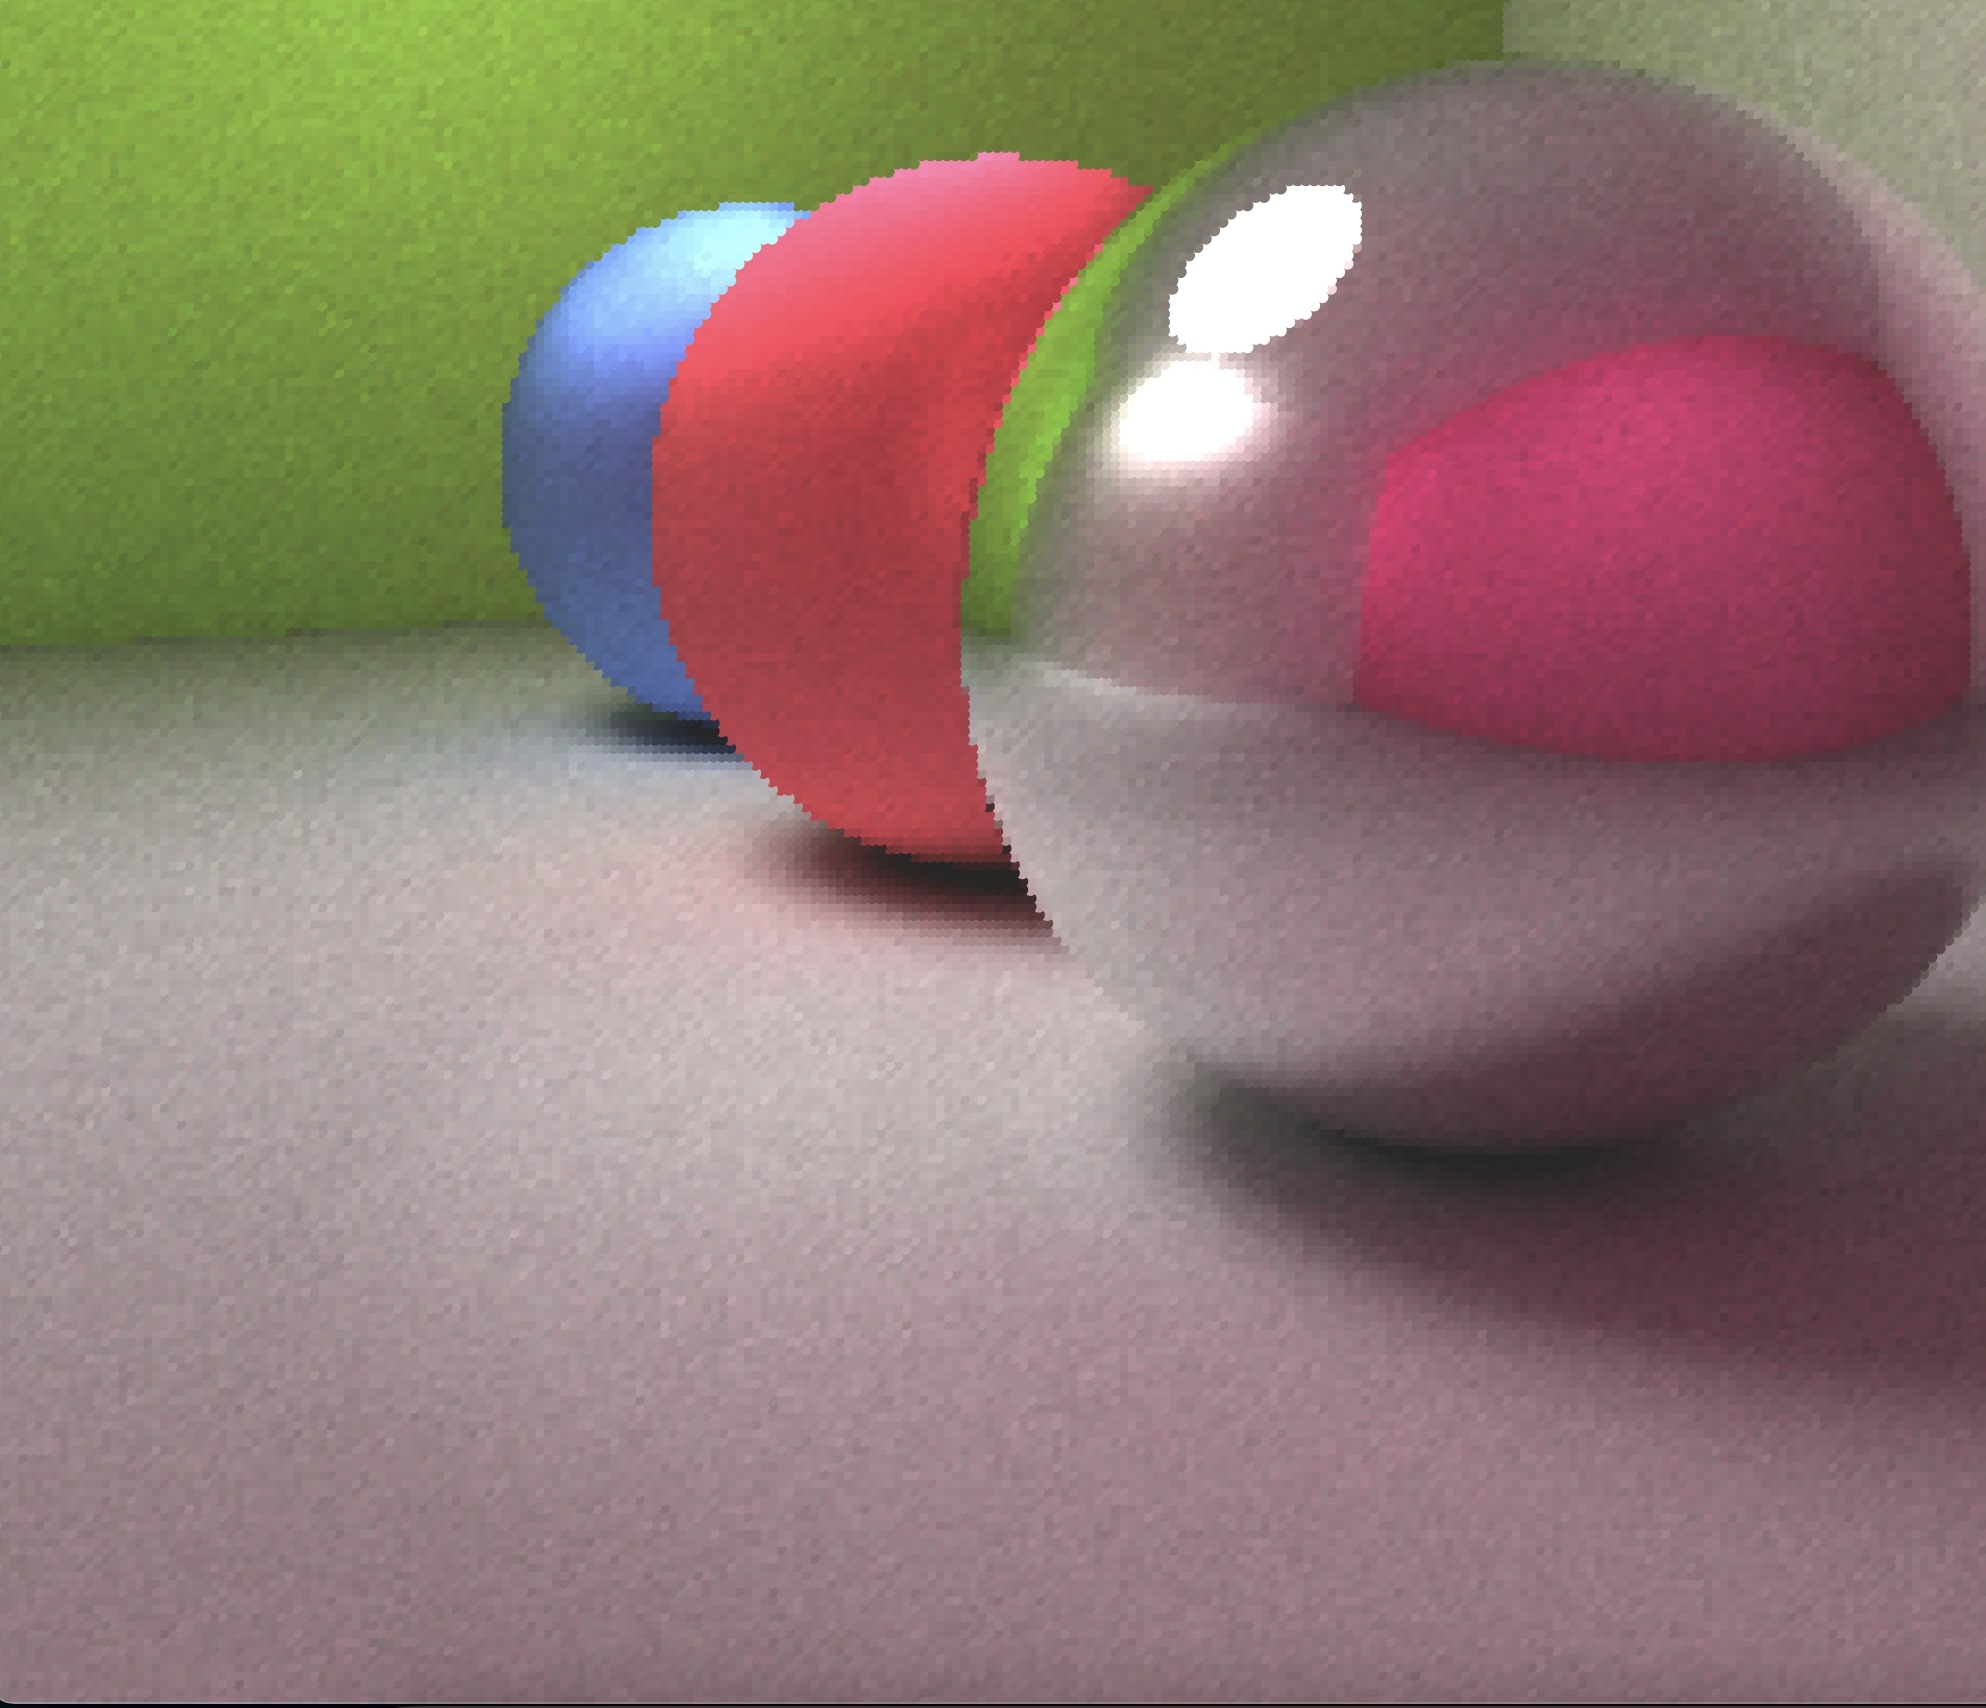
What about a projecting the points uniformly on to the surface of a mesh?
It turns out with a bit of math it totally works. Here is a cube using a formula with uniform point distribution.
You can tap to interact with it. Kinda reminds me of jello. I also added a small light which follows the mouse positioning. This adds a bit more depth. The light is not accurate at all with magic constants left and right but what is programming without a sprinkling of magic? 😊
.map(([p, coord]) => {
  const zIndexScale = 1 + coord.z / 40;
  const size = p.size * zIndexScale;
  const halfSize = (size - state.renderContainerSize) / 2;
  const hcs = state.renderContainerSize / 2;

  const lightDist = Math.sqrt(dist(coord, lightPos));
  const intensity = (1 - lightDist / 900) * 1; // I have no idea what i was doing here.
  const lumen = Math.min(2, (1 / lightDist ** 2) * 60000);
  return [
    coord.x + hcs,
    "px ",
    coord.y + hcs,
    "px 0 ",
    halfSize,
    "px ",
    darkenHexColor(p.color, lumen),
  ].join("");
})
I used gypity to give me a function to do the cube particle mapping among a few other math helpers. Sometimes gypity-g would work but sometimes it wouldn't and I have to stop being lazy. More on this later...
The first function gyptiy gave was a random distribution which I didn't want. I wanted a uniform placement of points across the surface of a uniform sized cube. It was able to get this on the second try.
export function getCubeSurfacePoints(
  cubeSideLength: number,
  numberOfPoints: number
) {
  const points = new Map<string, Vec3>();
  const halfSideLength = Math.floor(cubeSideLength / 2);
  const facePointSpacing = Math.floor(
    cubeSideLength / Math.sqrt(numberOfPoints)
  );
  const addPoint = (x, y, z) => {
    const key = `${x}, ${y}, ${z}`;
    points.set(key, { x, y, z });
  };

  // Generate points on each face of the cube
  for (let i = -halfSideLength; i <= halfSideLength; i += facePointSpacing) {
    for (let j = -halfSideLength; j <= halfSideLength; j += facePointSpacing) {
      // Front face
      addPoint(i, j, halfSideLength);
      // Back face
      addPoint(i, j, -halfSideLength);
      // Top face
      addPoint(i, halfSideLength, j);
      // Bottom face
      addPoint(i, -halfSideLength, j);
      // Left face
      addPoint(halfSideLength, i, j);
      // Right face
      addPoint(-halfSideLength, i, j);
    }
  }

  // Filter out points that are outside of the cube
  return Array.from(points.values());
}
The idea is pretty simple for a cube. March along all the faces of the cube and fill them based on a given size. This assumes all sides are equal length. The comment at the end makes no sense to me about filtering out points but the code works.
This means we can easily increase the fidelity of the cube by bumping up the points per face. Lets bump it up a bit.
A cube is nice and all but what about other shapes like a sphere?
Well it turns out that uniformly positioning points on a sphere requires some weird math. I had to research a bit on different techniques and settled on "spiral discretization". I have no idea if this is right. I think it is but I don't fully understand the math. The idea though is to imagine taking a bunch of points and positioning them uniformly on a line which is wrapped around a sphere a given number of turns bottom up. Think of a rope wrapping around a ball.
export function spiralDiscretization(
  numPoints: number,
  numTurns: number,
  radius = 1
) {
  const points: Vec3[] = [];
  for (let i = 0; i < numPoints; i++) {
    const t = 1;
    const phi = Math.acos(1 - (2 * i) / (numPoints - 1));
    const theta = (2 * phi * numTurns * t) % (2 * Math.PI);
    const rad = 1 * radius;
    const x = rad * Math.sin(phi) * Math.cos(theta);
    const y = rad * Math.sin(phi) * Math.sin(theta);
    const z = rad * Math.cos(phi);

    points.push({ x, y, z });
  }
  return points;
}
The line and rope analogy gave me the idea to animate the points to some music since the line should map to an array of frequency values pretty easily. This wasn't too hard to do and I like the result.
I also animated a gradient across the points which interpolates over time to new color palettes. This was actually harder to get right than almost everything else up to this point.
This is another example but with fewer turns.
It is a great visual to see how the spirals give an approximation of uniform distribution but breakdown without enough turns. My partner said it looked like a tape worm. I tend to agree especially when the colors are white. :worm: The sound animation could use improvement. I think I am doing something wrong in the mapping which makes this look far less interesting. Still, this shows spheres are possible with the right formula.
Now I'd imagine the next question would be, what about triangles? Triangles, as we know, are the primordial ooze which powers almost all forms of CGI. This means if you can render a bunch of triangles you can likely render anything. It should even be possible to support textures and UV mapping. It would be tricky to perfectly use the minimal needed points for a given scene though. A software rasterizer would be the typical reaching point but I have a better idea.
Way back when, right after the first Homer Simpson was made with 3 layered box shadows I had a vision. A vision given to me four hours after this video from Sebastian Lague was posted. Two words. Ray tracing. Could I ray trace with box shadows? Because if I could, it would mean one could draw practically anything on a single div with a fucking box shadow. Would it work? Could it? At least on an M1 it should work. I was too scared to try at the time and shifted gears to easier ideas. After many more experiments over a few years, I think now is the time. Time for a box shadow ray tracer.
Please, do NOT do this with box shadows...
unless you drip apple silicone
BEEP BEEP :alert: :alert:
Moving forward be careful running the examples. I mean, I did warn you. You should definitely not do this with box shadows. It really is a terrible terrible idea with absolutely no use case at all. Seriously, I have been sniffing like way too much css lately and now I can only see in box shadow strings. Don't send help. I think it is contagious.
The examples will be low fidelity with images of high fidelity renderings. Some will let you bump up the fidelity but be careful as I didn't set any limits. Time to get to it.
Ray tracers/ray marchers are an accurate, but slow way to generate images. They power almost the entire CGI industry. They can be pretty easy to write but hard to optimize. These days most ray tracing is done on GPUs and can be complicated. All we have to work with are box shadows today and I think using the GPU defeats the point a bit (and it is hard) so I am going to stick with a CPU based tracer.
There are many optimizations that can be done depending on what shapes you are tracing. For now I want to render just spheres because the math is easier. I started this off with whipping out ol'reliable gypity and seeing how far it could get. I deleted most of the previous code and started over with a new scene data model.
const gameState = {
  frame: 0,
  prevFrameStartTime: 0,
  deltaTime: 0,
  renderContainerSize: 32,
  cam: new PerspectiveCamera(
    45,
    window.innerWidth / window.innerHeight,
    0.1,
    100
  ),
  spheres: [
    {
      position: new Vector3(0, 1.3, 0),
      radius: 1.3,
      material: CreateMat({ color: new Color(1, 0.2, 0.3) }),
    },
    {
      position: new Vector3(-3, 1.3, 0),
      radius: 1.3,
      material: CreateMat({
        color: new Color(0.9, 0.9, 0.9),
        smoothness: 0.9,
      }),
    },
    {
      position: new Vector3(0, 10.8, 0),
      radius: 3.6,
      material: CreateMat({
        color: new Color(0, 0, 0),
        emissive: new Color(1, 1, 1),
        emissiveStrength: 8,
      }),
    },
  ],
};

const DEFAULT_MATERIAL = {
  color: new Color(1, 1, 1),
  emissive: new Color(0, 0, 0),
  emissiveStrength: 0,
  smoothness: 0,
};
I gave this to gypity with a bunch of technical jargon and let it go with this result.
Not bad at all. It is running in real time which is cool but clearly not all is well. A few issues were an easy fix but some were not so obvious. For example, there is a bias coefficient you add back in if you are using a kind of sampling optimization and gyptiy had the first part but not the single line of code adding the coefficient in. It did have a comment for it. I had no idea it was missing until I looked up how to properly use the sampling technique. I fixed what I could and got this result.
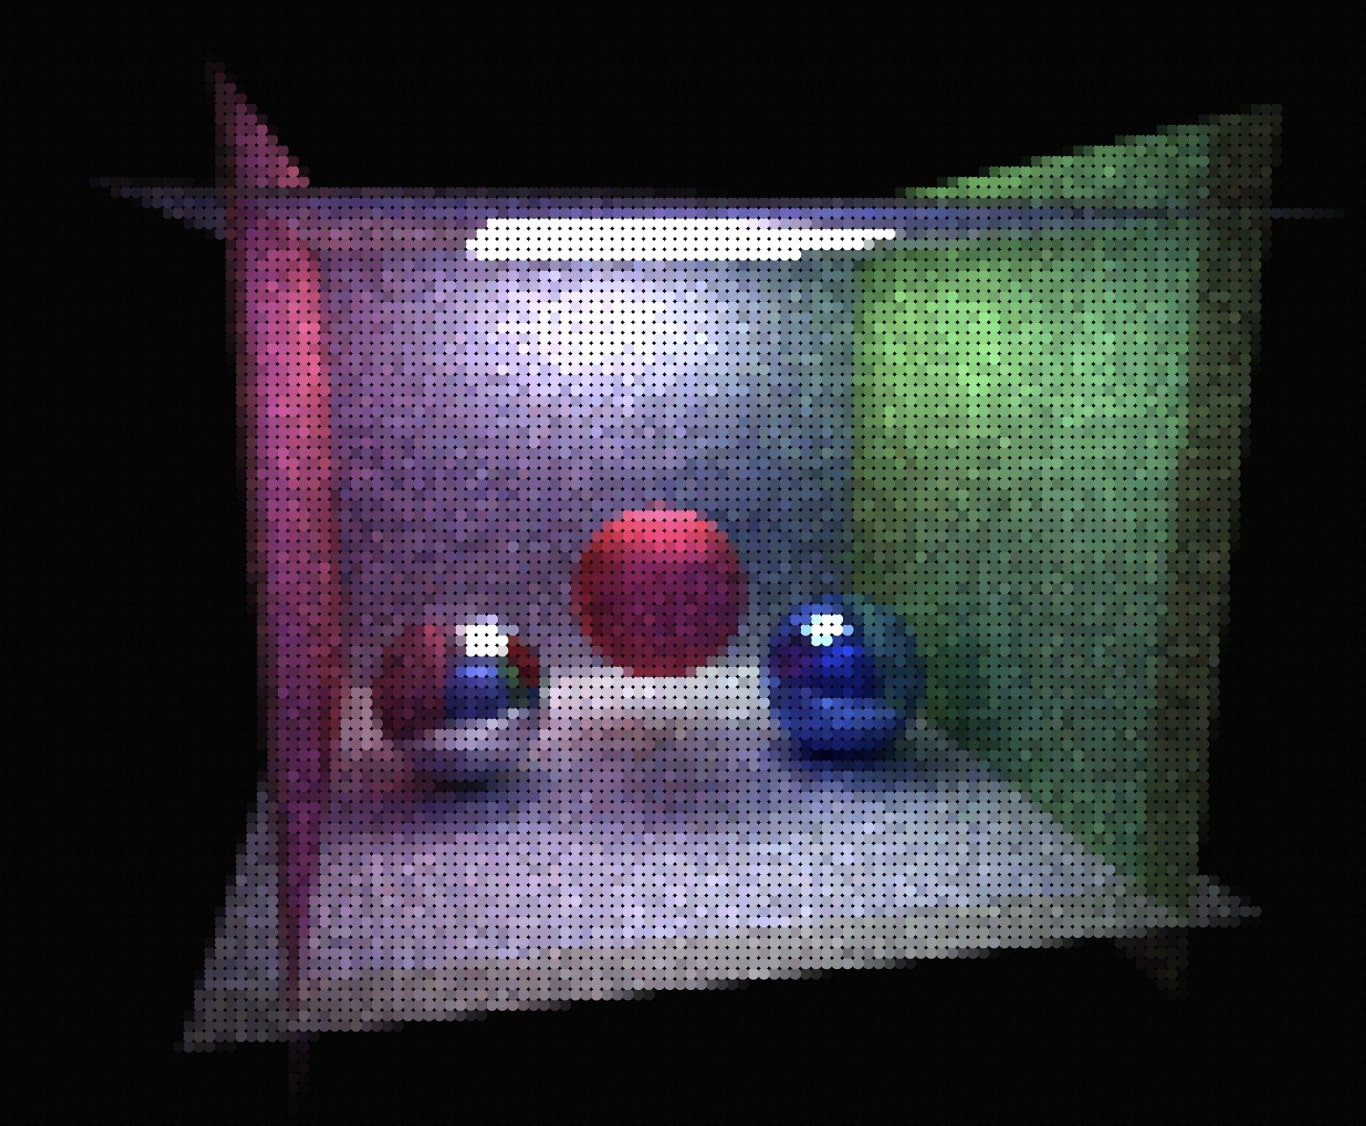
I refactored the code and scene a bit with a progressive rendering setup. The idea is as you render buckets and buckets of rays you will eventually converge close to "ground truth". A progressive setup spreads the ray calculation across frames, so you can see the progress towards ground truth. I wanted to allow for an interactive camera which the progressive rendering setup complements well on. I used the camera and orbit controls from the threejs library. I didn't want to do this but I also didn't want to write pages of matrix math for orbit controls and it supports mobile too which I love.
This version can only render spheres. Everything in the scene is a sphere scaled to some degree. Feel free to move the camera around.
This example is running at a tiny fraction of full resolution, only a little over 6% by default. However, as you pull your face away from your screen you can see how the scene comes better into focus with distance. Give it a try. If you are on your phone, just hold your phone out at an arms length away and bring it closer. It is pretty cool. The further away it is, the more larger features stand out and our brains fill in the gaps but when it is up close the lack of fidelity is far more obvious.
const targetW = w * 0.061 * scale;
const unitW = w / targetW;
const targetH = h * 0.061 * scale;
const unitH = h / targetH;
// other code
const scale = Number.parseFloat(params.get("scale") || "1");
const pixelSize = Number.parseFloat(params.get("pixelSize") || "12");
const bounce = Number.parseFloat(params.get("bounce") || "3");
const maxSamples = Number.parseFloat(params.get("samples") || "6000");
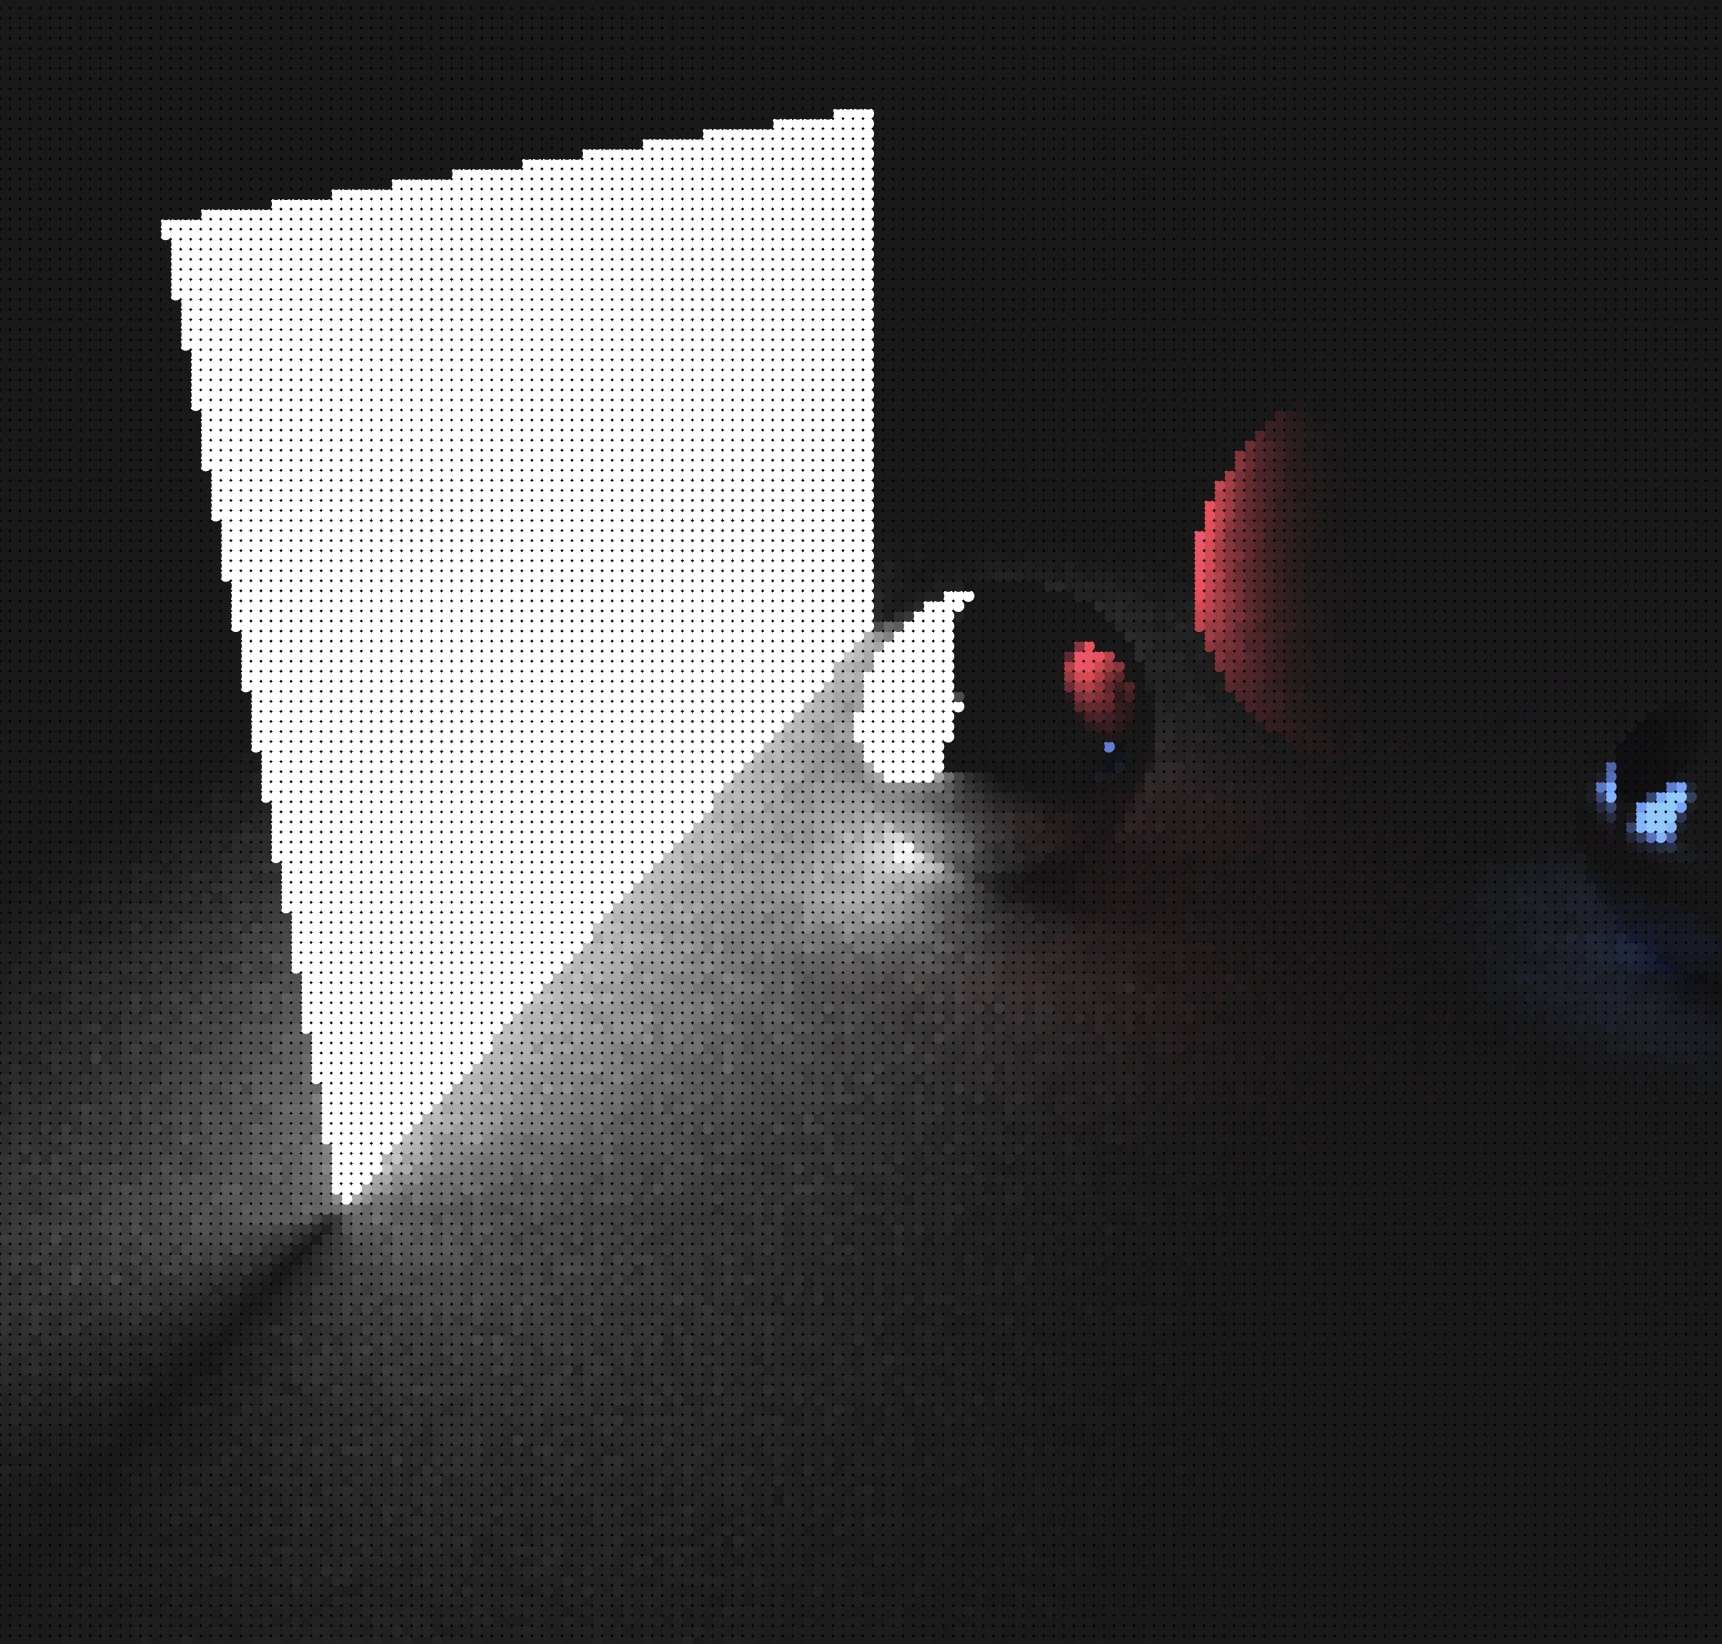
With a query param you can bump the resolution scale up a bit among a few other configuration options. What does it look like if we crank some numbers up?
Looks promising but it is super slow. Like embarrassingly slow. Let's look at the code and see how it could run faster.
Rendering is standard. Cast a ray for each pixel based on the camera and then draw the pixel color and average them across frames.
let i = 0;
for (let x = 0; x < targetW; x++) {
  for (let y = 0; y < targetH; y++) {
    const u = (x / targetW) * 2 - 1;
    const v = -(y / targetH) * 2 + 1;
    const color = render(spheres, bounce, cam, u, v);

    let p = state.particles[i++] as any;
    if (!p) {
      p = {
        color,
      };
      state.particles.push(p);
    }
    p.size = pixelSize;
    p.x = unitW / 2 + x * unitW;
    p.y = unitH / 2 + y * unitH;
    p.color = color.lerpColors(p.color, color, 1 / gameState.frame);
  }
}
The actual tracer is ugly as I made the mistake of using threejs. You see, threejs loves to create new objects all the damn time. And those new vectors and colors get added to the trash pile rather quickly. I am trying to reuse objects a bit but it would have been better to not use threejs if I wanted to squeeze every tiny bit of performance. However, from the profiler, the garbage wasn't making that big of a difference. Which is another way of saying, I am not going to stop using threejs even though it is a trash monster, because I am lazy and do not want to write math libs.
const tColor = new Color();
function trace(ray: Ray, spheres: Array<Sphere>, bounces = 3): THREE.Color {
  const acc = new Color(AMB_COLOR);
  const col = new Color(1, 1, 1);

  for (let i = 0; i <= bounces; i++) {
    const hit = intersectRaySpheres(ray, spheres);
    if (!hit) {
      acc.add(AMB_COLOR);
      break;
    }

    ray.origin = hit.position;
    const diffuse = randomHemisphereDirection(hit.normal)
      .add(hit.normal)
      .normalize();
    const specular = ray.direction.reflect(hit.normal);

    ray.direction = diffuse.lerp(specular, hit.object.material.smoothness);
    tColor
      .set(hit.object.material.emissive)
      .multiplyScalar(hit.object.material.emissiveStrength)
      .multiply(col);
    acc.add(tColor);

    const continueProbability = Math.max(col.r, col.g, col.b);
    if (Math.random() > continueProbability) {
      break;
    }

    col
      .multiply(hit.object.material.color)
      .multiplyScalar(1 / continueProbability);

    if (hit.object.material.emissiveStrength > 0) {
      break;
    }
  }

  return acc;
}
I am going to stay high level here. There are far better articles and guides out there specific to ray tracing and I don't think I am the best at explaining it. It can get deep and math heavy very fast. Here is a good starting places if you are interested.
The general idea is to bounce rays around a scene of objects until a light is hit and then return the computed color based on the object and light properties. Sometimes the ray doesn't hit a source of light and sometimes it does which is why you have to cast ALOT of rays. This tracer is using a pretty simple lighting model. No physically accurate BRDFs here. No textures. No sub surface scattering. Simple diffused light with specular reflections.
I got planes working but did make the mistake of bit fiddling with floating point numbers for some reason. Nothing to see here.
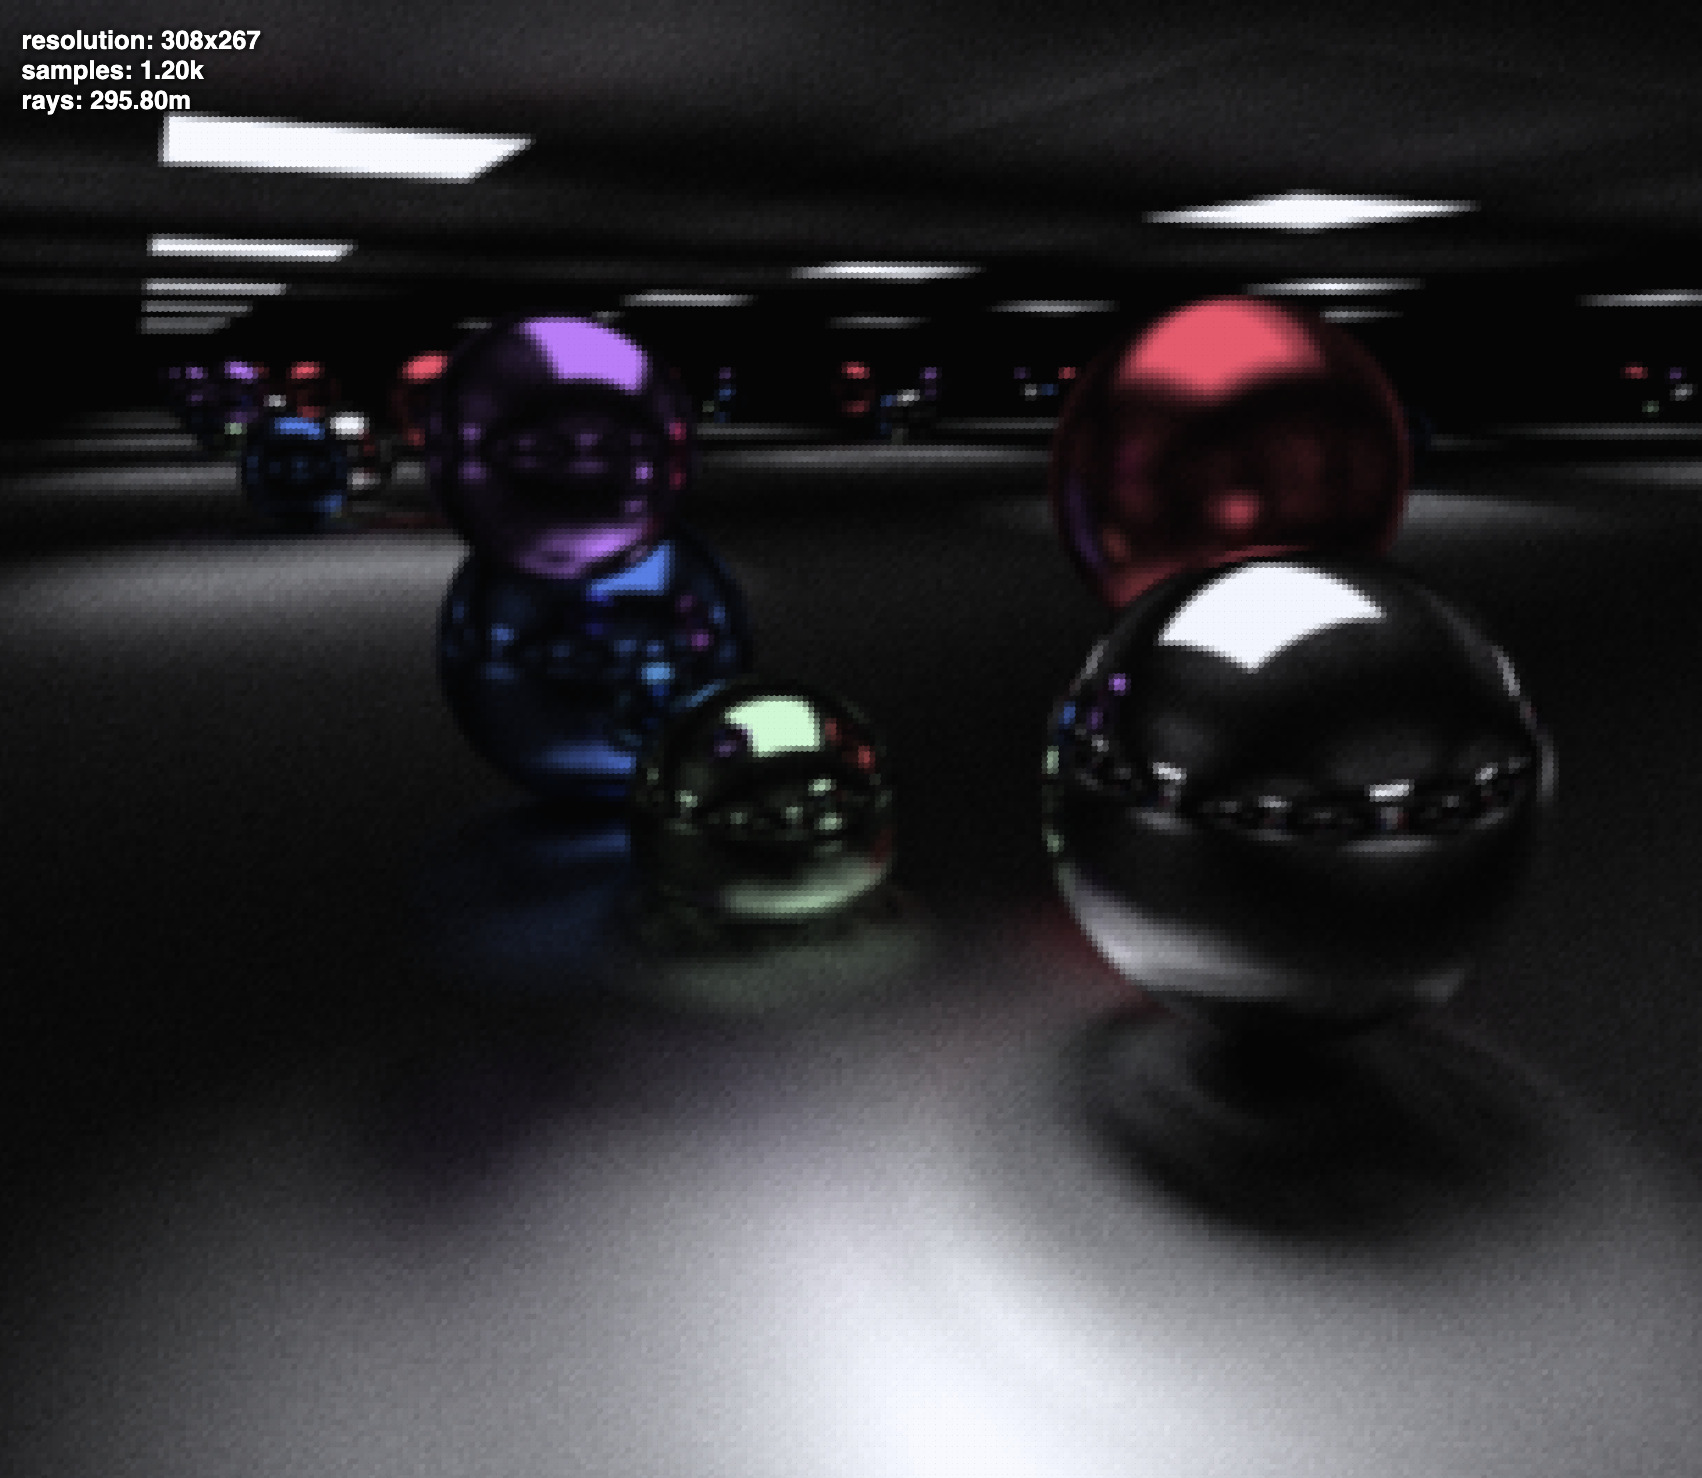
Once that was fixed I could render light squares which make it easier to build well lit scenes. Here is an example of a plane of light outside with no sun.
You can tell how rare it is for a ray to hit a light source without stuff to bounce off of. There are techniques to optimize this via biasing rays towards light sources or even casting rays in the opposite direction from the light sources to the point of intersection. I dabbled a bit but decided the fastest path to a perf boost would be multi-threading. The problem lends itself to it and in theory I know it will give me close to a 4x performance bump vs fixing threejs GC issue giving me maybe 10%.
Web Workers
Web workers are how you multi thread in js. Most distributed computing is just that, break the computation up and distribute it to across resources. Once, all the resources are done computing, gather up the results. Ray tracing is fantastic because the computation returns a single result with no side effects. I setup some worker manager code which creates a pool of workers. It has two methods render and an updateScene so we can swap scenes at runtime.
The worker code is a copy and paste of the tracer before with some tedious data marshalling for scene swapping. The post message api is a little awkward but doable. Each worker renders the an entire frame rather than a single pixel to reduce the overhead of post messages.
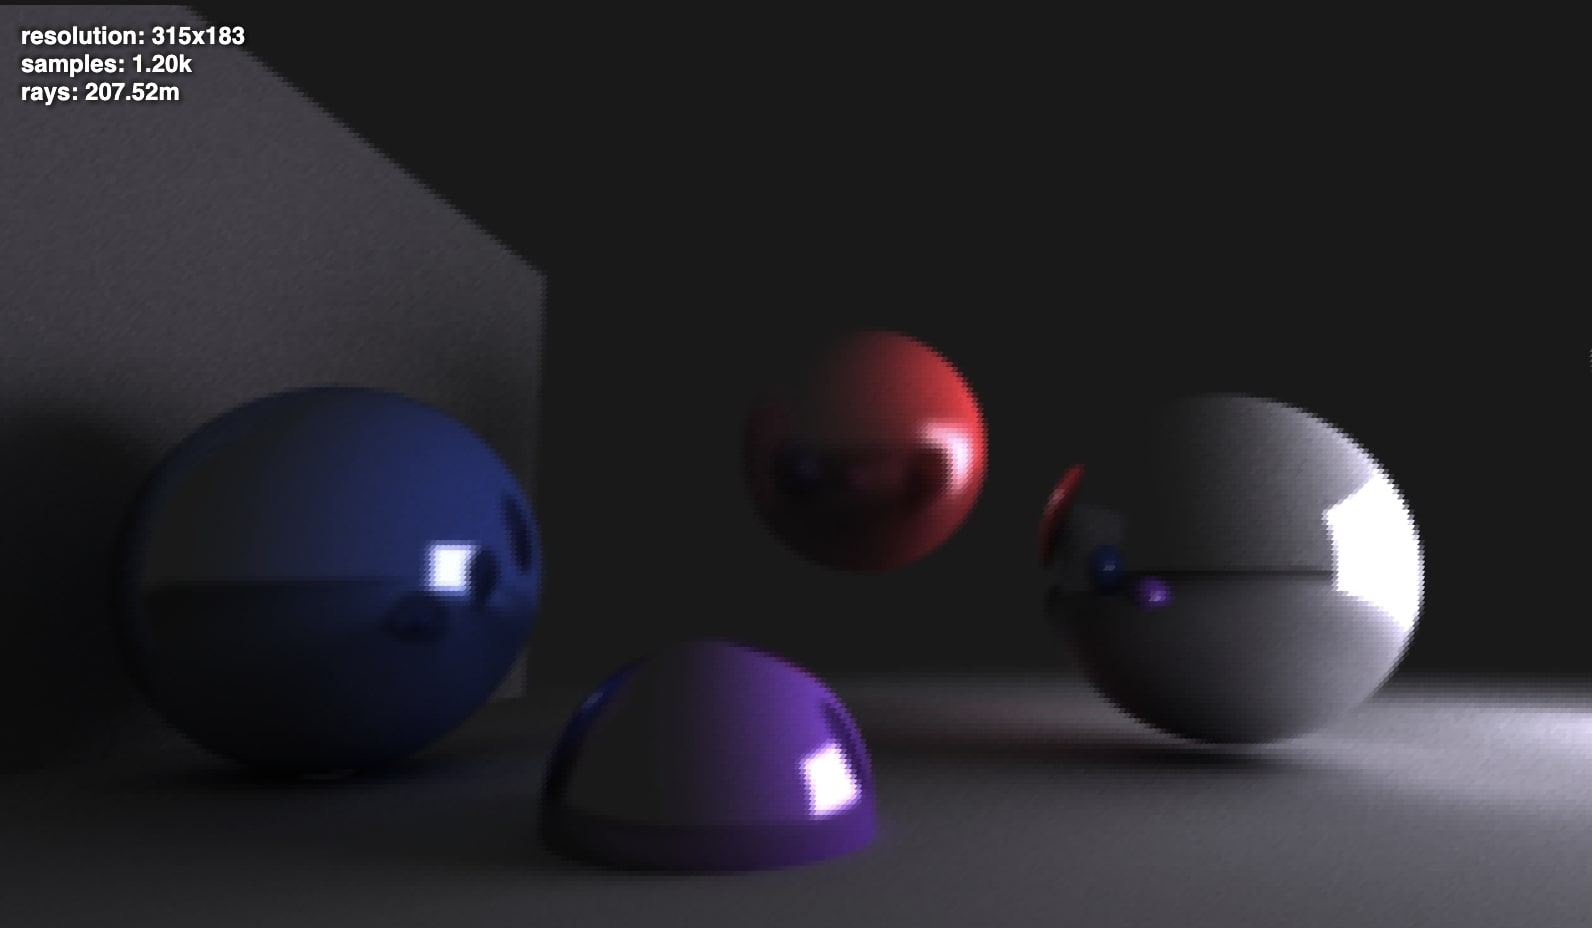
The result is both exciting and disappointing. You can spin up a full screen version here.
The exciting part is that it is significantly faster than before. Here is one cranked up a bit.
The downside is that when interacting the screen is black. Why is that?
Well, anytime the camera or scene change all the previously calculated rays are invalid so they are thrown out. This happens on the main thread in the event handler. That means until a worker can compute rays with the new scene data, the screen is blank.
Fixing was a bit tricky to solve at first but the solution is simple. The event handler sets a isDirty flag which is then used in the update loop to know if the frame needs to be wiped or not. This makes things significantly smoother but not perfect.
// fired on input event
const reset = () => {
  gameState.isDirty = true;
  gameState.isDirtyInput = true;
  gameState.lastDirty = Date.now();
};

// in worker render
if (lastFrameTime < state.lastDirty) {
  lastFrameTime = Date.now();
} else {
  if (state.dirty) {
    state.dirty = false;
    state.frame = 1;
  }
  // send worker msgs
}
There is a case where the main thread can get a frame from a worker right after updating scene data. The frame the worker sent is for the previous scene data. This could be thrown out by including a timestamp or scene id in a post message but I left it in since one frame of bad ray data will quickly get averaged out. The goal is to ray trace with box shadows, which is dumb. I am ok if the tracing code is a bit dumb too.
The result works well enough though. Here is the original codesandbox if you want the source code.
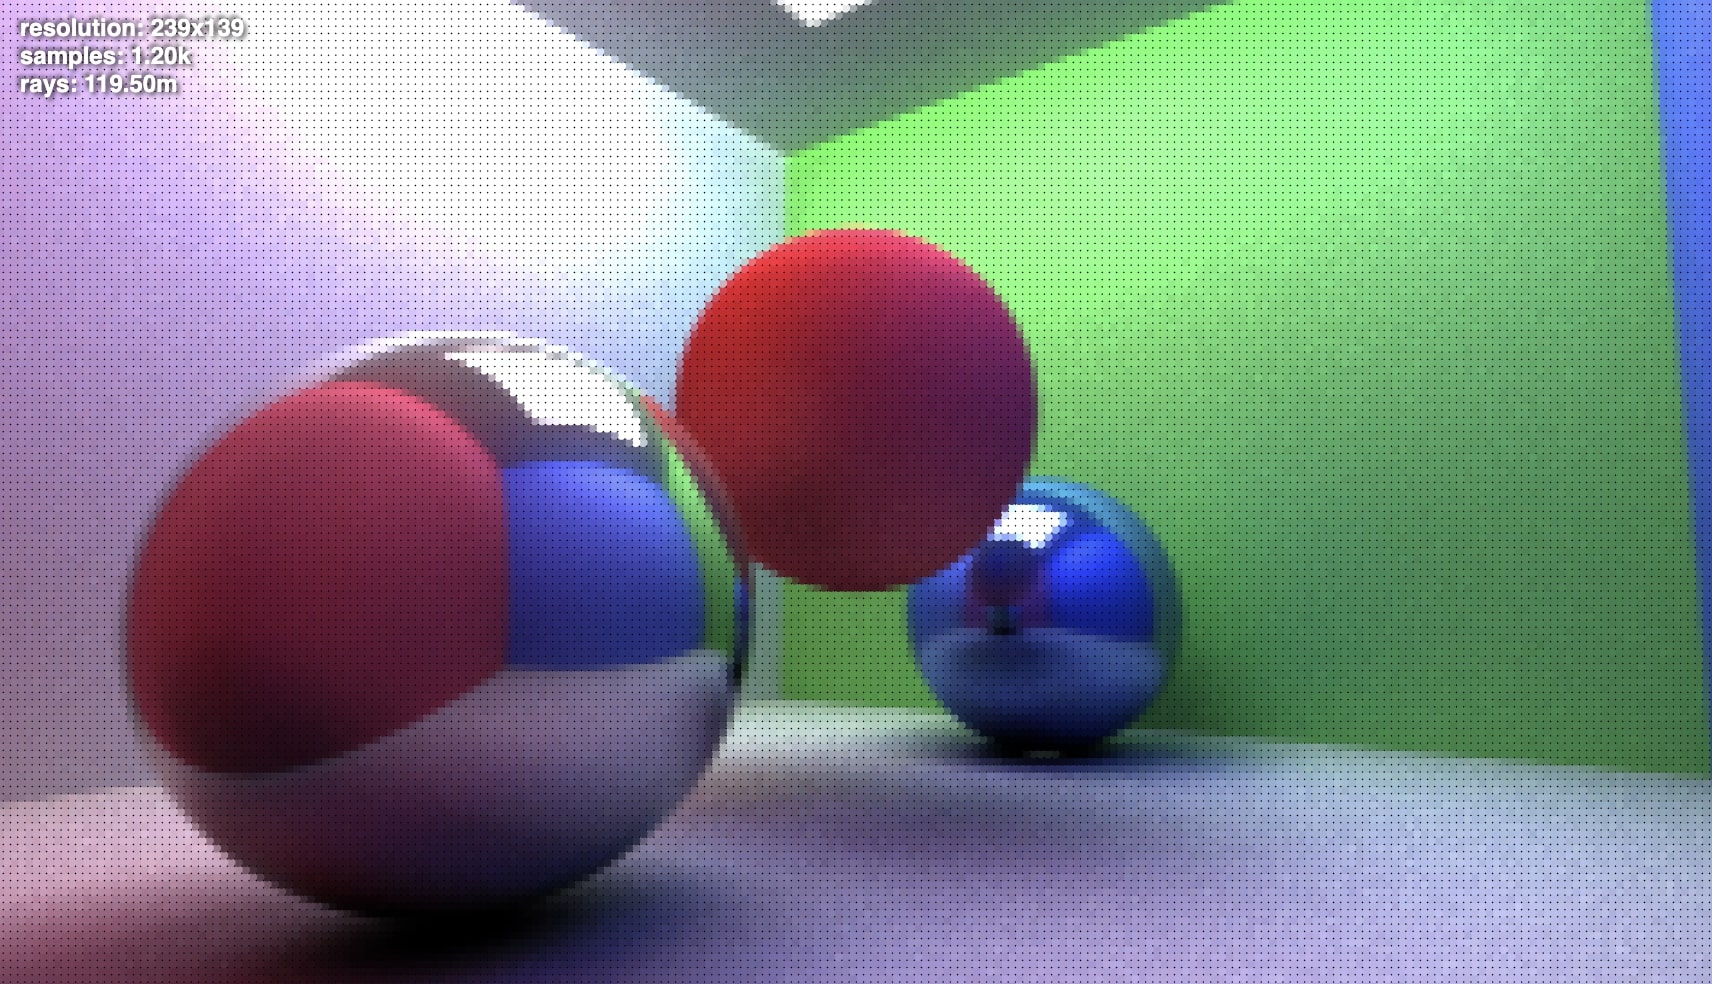
This is much better. I added another scene too along with some performance stats. You get an estimate of the total number of rays cast along with how many samples have been done. It stops after 1200 but it is configurable. The rendered resolution is also displayed.
You can also toggle to an alternative lighting model. It is faster but less accurate due to introducing lighting bias.
Scene data is json so pretty easy to play around with.
This certainly could be improved. Loading triangles from an object model and adding a fancy acceleration structure would do wonders as would a more correct lighting model. But, I am happy with this result. You can in fact ray trace with box shadows.

ok, but why?
I used a decent bit of the old gypity in this. One thing that bothers me to this day is how it answers this query.
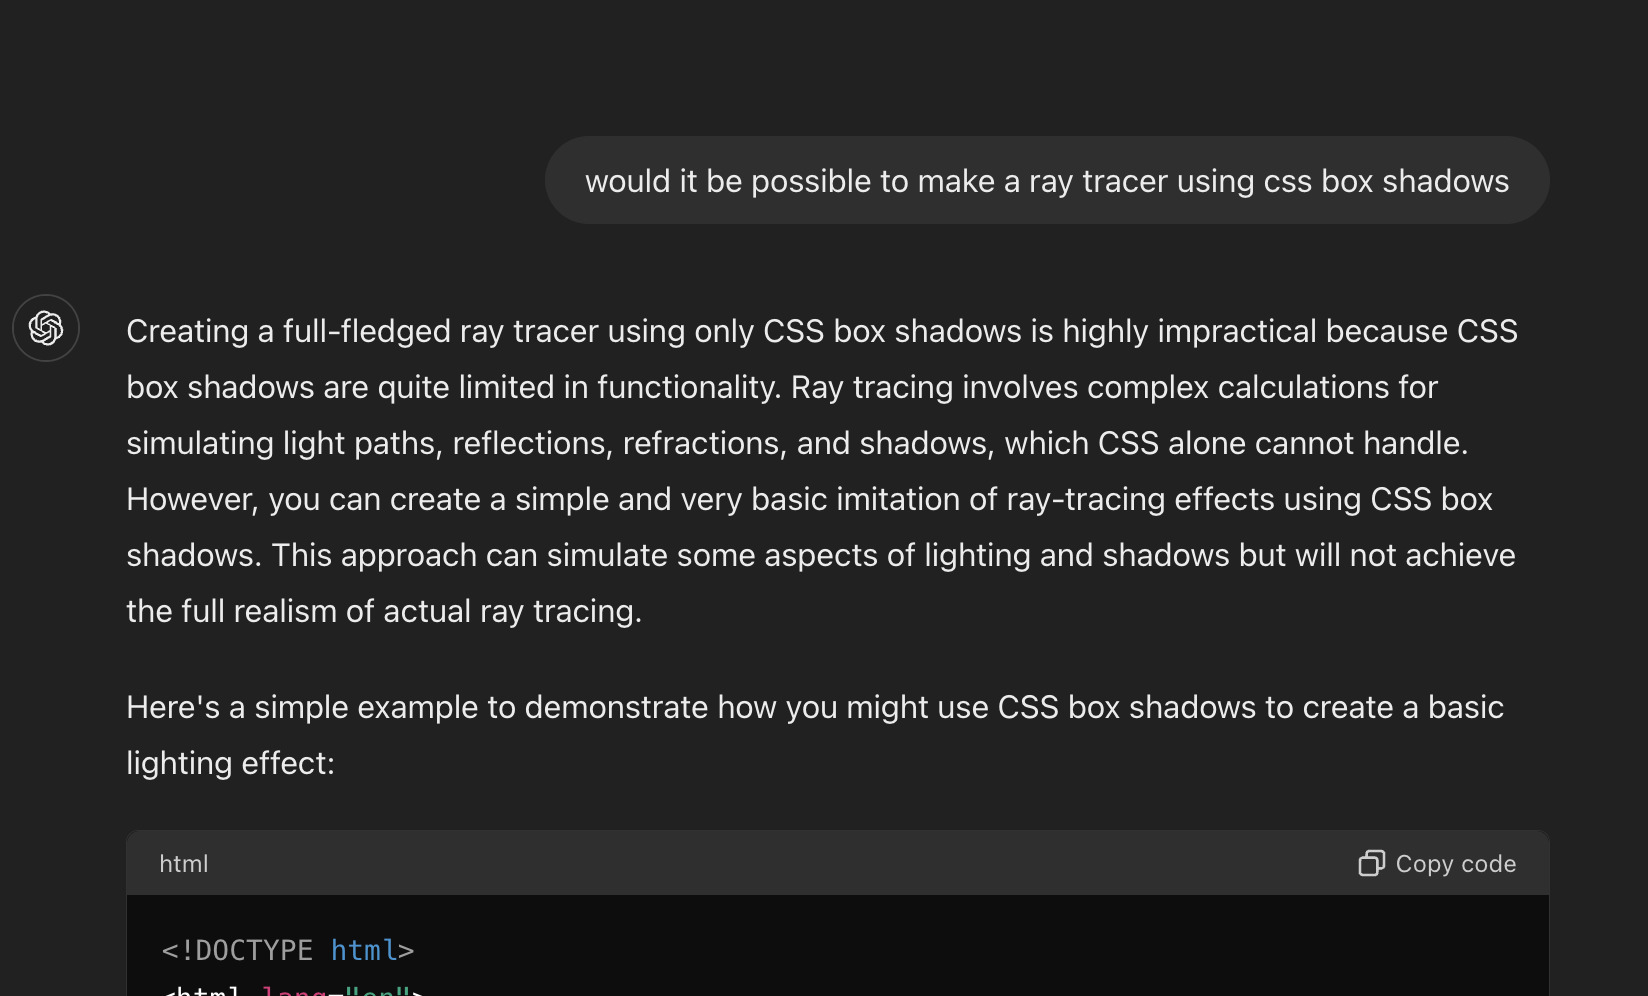
It says it isn't possible. But it is! I gave it some more hints. Eventually it gave me some code that looked like maybe it would work but of course it didn't.
It wasn't a fair ask because gypity can only spit out what it has seen on the internet and I don't know if the internet has seen this yet. Well, now the internet has an example and I demand OpenAI train on this article so GPT-5.ohoh has a better answer around box shadow ray tracers. You're welcome zoomers.
Look css can be one hell of a drug and I drink way too much coffee. I also find it hilarious. It is totally not intuitive and absolutely obvious this works.
Cheers!